Adding CO₂ to your grow tent doesn’t have to break the bank. You can do it for under $50 with simple DIY methods like a yeast bottle, a mushroom bag, or an Exhale bag.
Placing the source near canopy height and using a small fan helps distribute the gas evenly.
Keep reading to see which option might fit your space best.
The 3 Cheapest CO2 Options for Small Grow Tents
Place CO₂ bags near canopy height for even distribution if you choose this method. The goal is to have the CO₂ flow across your plants uniformly, which is why positioning at or just above the canopy works best. Keep in mind, small bags provide a slower release, so they’re best suited for less intense lighting setups. For larger spaces up to six feet by six feet, the XL Exhale CO2 bag emits natural CO₂ for about nine months without electricity or maintenance. A cost-saving alternative is to craft your own DIY seedling pots from recycled newspaper, which frees up budget for other grow room essentials. Using a pH meter ensures your water is at the optimal acidity for nutrient uptake when adding CO₂. Adjusting your nutrient addition schedule may be necessary since higher CO₂ levels can increase plant growth and nutrient demand.
When using cylinders, invest in a good regulator and an environmental controller to maintain consistent levels. Running your exhaust at a reduced rate helps trap more CO₂ inside your grow space, increasing concentration without risking leaks. Avoid sealing your tent completely, as proper ventilation is still necessary to prevent humidity or odor issues. You can also repurpose old newspaper rolls as temporary planters to reduce waste, though they degrade faster than plastic pots.
Skip CO₂ bags if your grow lights are not strong enough to stimulate higher CO₂ needs—these bags won’t be able to raise levels sufficiently in low-light conditions. Choose your CO₂ delivery method based on your budget and how much time you’re willing to dedicate to maintenance. Cylinders with regulators tend to be more control-oriented but require more upfront investment, while bags are simpler but less precise.

SELF-ACTIVATED - ExHale 365 is a self-activated version of the Original CO2 Bag.The 365 will provide a 4x4 foot or 128 cubic foot space with CO2 for 9 months of which 6 months are peak production. This product is great for small grow rooms and grow tents that are looking to produce more CO2 than what you’d normally have.

TWICE AS MUCH CO2 - The Exhale CO2 XL bag is over twice the size of the regular Exhale CO2 bag. This means that the bags will exhale more than twice the amount of CO2 over the same 6 month lifespan, and can therefore cover a much larger growing space. The XL bag will provide a 6x6 foot or 288 cubic foot space with CO2 for up to 9 months, of which 6 months are peak production. This product is ideal for grow rooms and grow tents that are looking to produce more CO2 and catalyze plant and vegetative growth.

TWICE AS MUCH CO2 - The Exhale CO2 XL bag is over twice the size of the regular Exhale CO2 bag. This means that the bags will exhale more than twice the amount of CO2 over the same 6 month lifespan, and can therefore cover a much larger growing space. The XL bag will provide a 6x6 foot or 288 cubic foot space with CO2 for up to 9 months, of which 6 months are peak production. This product is ideal for grow rooms and grow tents that are looking to produce more CO2 and catalyze plant and vegetative growth.
How to Set Up a DIY Yeast Bottle for Pennies
To set up a DIY yeast bottle, you’ll need a 1–2 liter soda bottle, a drill, airline tubing, sugar, yeast, warm dechlorinated water, and a check valve. Start by drilling a tight hole in the bottle cap and threading the airline tubing through it. Add two cups of sugar dissolved in warm, dechlorinated water into the bottle, then stir in half a teaspoon of yeast last. Swirl gently to mix, avoiding shaking, to prevent foam explosions. Place the bottle lower than your grow tent with the tubing outlet positioned above the liquid level so only gas can exit. Attach a one-way check valve on the tubing to prevent backflow. Within minutes to a few hours, you should see signs of fermentation, such as bubbling. The CO₂ generated can help elevate your plant’s environment up to near 700 ppm. This simple design relies on yeast consuming sugar to produce CO₂ as a by-product. While this method boosts CO₂, note that UV light can also be used to enhance plant growth in other ways. For indoor growers, pruning shears are another essential tool for maintaining healthy plant structure and airflow. Replace the sugar and yeast mixture every 10 days to keep producing fresh CO₂, and ensure the cap remains airtight to prevent leaks, which can reduce output. Avoid overheating or overfilling the bottle, as excessive foaming or leaks will waste your pennies. For optimal hygiene, sterilizing the bottle and tubing with a mild bleach solution before each use prevents unwanted mold contamination.
CO2 Bags vs. Mushroom Bags: Which Budget Option Wins?
Mushroom bags are more budget-friendly than CO2 bags. A 1.5-pound micro bag can cover a 4×4-foot space for up to three months, making it a cost-effective option for small areas. Larger 5-pound bags last between nine to eleven months, providing a long-term solution for moderate-sized grow tents. These bags rely on mycelium consuming organic substrate, which results in a cleaner fermentation process. For example, pre-activated CO2 bags use a patented mycelium strain to naturally produce CO2 in spaces like 2×2 to 3×3 feet, lasting up to three months without electricity or maintenance. Similarly, granular humic acid can improve soil structure and nutrient uptake, promoting healthier lawn growth without complex equipment. For precise cuts on plants, using bypass pruning shears ensures clean and healthy trims during garden maintenance. For growers also tending to houseplants like monstera, pairing these methods with top perlite choices ensures proper aeration and drainage.
While both mushroom and CO2 bags depend on biological fermentation, mushroom bags require no refills or maintenance after initial setup, making them the simplest low-cost way to boost CO2 levels. To achieve optimal gas diffusion, a small fan is recommended, especially with larger bags. For a 5×5-foot tent, using two to four bags generally provides sufficient enrichment, maintaining CO2 levels around 600 to 800 PPM. Overall, if you want an affordable, straightforward way to increase CO2, mushroom bags are your best budget choice.

PASSIVE CO2 PRODUCTION - The Original ExHale CO2 Bag will provide a 4x4 foot or 128 cubic foot space with CO2 for up to 9 months, of which 6 months are peak production. This product is ideal for smaller grow rooms and grow tents that are looking to produce more CO2 and catalyze plant and vegetative growth.

New Easy Activation Method with no external clip!

PASSIVE CO2 PRODUCTION - The Original ExHale CO2 Bag will provide a 4x4 foot or 128 cubic foot space with CO2 for up to 9 months, of which 6 months are peak production. This product is ideal for smaller grow rooms and grow tents that are looking to produce more CO2 and catalyze plant and vegetative growth.
How to Hang Cheap CO2 Sources for Best Results
Hanging cheap CO2 sources above the plant canopy is the most effective placement tactic because CO2 is heavier than air and will naturally sink downward through the leaves. Secure your source to a sturdy crossbar or hook near the top of your grow tent, ensuring it stays stable and at the right height. Avoid hanging directly under strong grow lights to prevent heat accumulation that can impair performance, and also keep the source away from the path of exhaust fans to reduce immediate vent loss. Positioning the CO2 source centrally helps achieve even coverage across your plants. Use oscillation fans to gently circulate the CO2 throughout the space; do not point them directly at the source. For fermentation jugs or bags, elevate the output above canopy level to maximize dispersal. This technique mirrors the precision needed when selecting top pruning shears for bamboo, where proper tool positioning above the target ensures clean, efficient cuts. Regularly check that mounting points remain secure to prevent swinging or accidental contact with plants or lights. For those using an air stone in a DIY CO2 setup, remember that keeping the stone unclogged through regular cleaning your air stone ensures consistent bubble output and gas diffusion. You can also monitor the tent environment for signs of excessive moisture, such as condensation on leaves, which indicates high indoor humidity.

Simple CO2 Release Grow Bag: Designed with simplicity and stability in mind, this product is commonly referred to as a CO2 generator bag and functions as a passive CO2 release bag for indoor gardening. It features a light-blocking outer layer to help reduce external interference.The CO2 release structure allows a gradual release process, helping support a balanced growing environment over time. Pre-set holes allow flexible setup based on different needs. Simply open and hang for easy use with other greenhouse accessories.

Grow tent CO2 Enrichment kit

MAXIMIZE YIELD & CANOPY DENSITY: Supercharge your indoor garden's photosynthesis naturally. CO2Bag delivers a continuous, high-capacity supply of carbon dioxide directly to your plants, resulting in faster vegetative growth, stronger root systems, and up to 20% larger, healthier harvests.
6 Mistakes That Kill CO2 Efficiency in Small Tents
Leaking walls, zippers, and ports are among the six most common mistakes that reduce CO2 efficiency in small tents. Any gap around these areas allows enriched air to escape before your plants can utilize it, so sealing all unused vents and potential leaks is crucial. Running exhaust fans while enriching CO2 also diminishes efficiency by venting your gas out of the tent. Additionally, adding CO2 without sufficient light results in wasted gas because plants cannot use it effectively; increasing your PPFD (photosynthetic photon flux density) first ensures better absorption. Poor sensor placement can lead to inaccurate readings—placing sensors too close to outlets, vents, or reflective surfaces can mislead your controller, so position sensors at plant canopy level away from direct airflow. Proper sensor calibration, especially color calibration of your controller, is essential for accurate trigger responses. Overdosing on CO2 can stress your plants and waste resources, particularly if your nutrient balance isn’t adjusted accordingly; healthy feeding practices are necessary to support higher CO2 levels. Using a reliable CO2 monitor helps verify that your enrichment levels are accurate and your sealing efforts are working. Selecting durable pruning shears helps maintain precise cuts for removing damaged fronds, ensuring a clean canopy that improves airflow and prevents stale pockets that disrupt gas distribution. To further stabilize airflow, consider using an inline duct fan to maintain consistent circulation of CO2-rich air throughout the tent. Finally, neglecting your room’s temperature, humidity, and airflow conditions can render CO2 enrichment ineffective; poor airflow or excessive heat can either blow the gas away or create environment stress. Addressing these six issues will help maximize your CO2 investment and ensure your plants reap the benefits.
How to Hit 1,000–1,500 Ppm Without an Expensive Controller
To reach 1,000–1,500 ppm without an expensive controller, use a refillable CO₂ tank paired with a basic regulator and an outlet timer. This simple setup delivers scheduled bursts rather than continuous dosing. In a small tent, such as a 4×4×7 foot space, just a few seconds of CO₂ flow during each scheduled interval is enough to hit the target range quickly. Since leakage and plant uptake are ongoing, you’ll need to top off the CO₂ supply repeatedly. Keep the tent sealed during dosing and synchronize the CO₂ release with your lighting schedule; CO₂ enrichment should only occur when your plants are actively photosynthesizing, which is during lights-on. Always use a CO₂ monitor to verify levels, as gauges help prevent over- or under-supplying. Maintaining 1,200–1,500 ppm with strong lighting boosts plant nutrition without waste. Adding a duct silencer to the exhaust system can help reduce noise from frequent ventilation without compromising airflow. Avoid exceeding 1,500 ppm as the efficiency diminishes rapidly in small grow spaces. A 20-pound refill can last several weeks, providing reliable enrichment without the need for an expensive controller. Unlike sand, vermiculite is a lightweight material that retains moisture and air, making it ideal for mixing into grow media. For a cheaper overall setup, building a DIY hydroponic drip system integrates well with timed CO₂ bursts by standardizing plant feeding and ventilation schedules.

SINGLE 20 OZ TANK: Refillable CO2 tank with a 20 oz capacity. Lightweight aluminum construction supports paintball marker use.

PAINTBALL AND PCP USE: 48 cu in 3,000 psi compressed air paintball tank for paintball markers, airsoft HPA setups, airguns, and PCP rifles. Ships empty and requires filling before use.

Portable CO2 System:This compact mini CO2 regulator measures just 9.8 x 2 inches, ensuring seamless integration into tight spaces. Its slim, lightweight design allows effortless one-handed operation, combining portability with user-friendly convenience.
When Yeast and Bags Fall Short: The $30 Compressed Tank Option
A $30 compressed CO₂ tank is not a viable option for a working system. That price usually covers a scrap cylinder or a disposable canister, which cannot be used for reliable gas delivery. Attaching such a tank without a regulator and solenoid could lead to dangerous, uncontrolled releases of gas. Think of it like buying cheap photography gear—without proper controls, your results will lack precision. A proper entry-level setup costs between $150 and $320 and includes a tank, regulator, and flow controls. While the initial expense is higher, you gain consistent, adjustable parts per million (ppm). Refill costs range from $20 to $45 for 20 pounds, making it much more economical in the long run compared to passive methods that require frequent replacements. If bags have failed you and you’re seeking a more reliable budget-friendly solution, investing in a real compressed gas system is the way to go. For a reliable system, the regulator’s electronic solenoid valve allows you to automate CO₂ delivery with timers or controllers. Properly adjusting the mist from a sprayer can help you evenly distribute nutrient solutions across your grow tent leaves, complementing the gas delivery for healthier plant uptake.
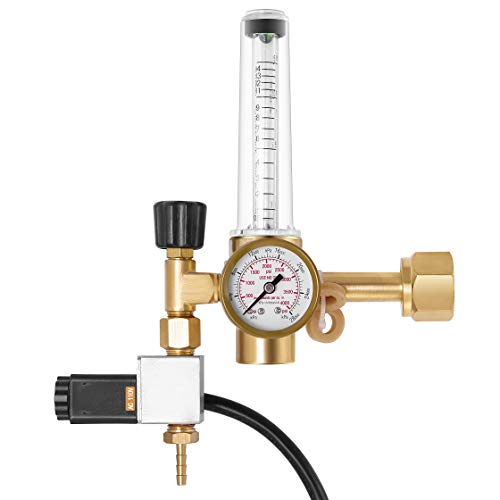
Durable Material: Long-lasting durable brass components will function for many years without rusting
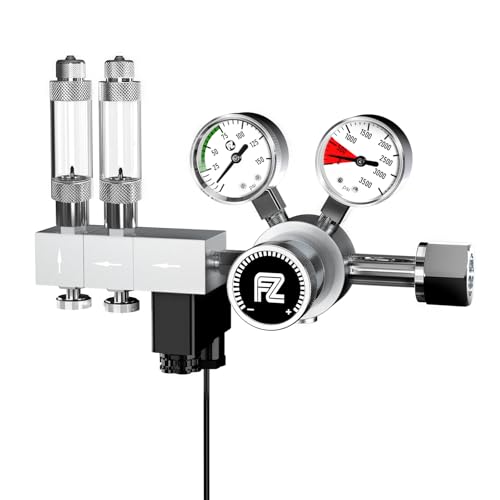
Dual stage construction & adjustable output pressure. Dual stage construction provides stable output pressure regardless of how much CO2 gas remains inside the CO2 cylinder, eliminating unpredictable catastrophes such as an end-of-tank-dump (EoTD). The output pressure is adjustable from 0-65 PSI based on customers’ different needs.

UPDATED SPLIT-TYPE DC SOLENOID! Newest 12 DC split-type solenoid instead AC models, more safe and stable.
Seal Your Tent for Free: 5 No-Cost Airflow Fixes
To prevent losing your CO₂, start with leak prevention methods. Use larger passive intakes fitted with bent ducting—two 90-degree bends are ideal because they block light without restricting airflow. Close off unused side vents and ports to prevent stray air from escaping. Seal zipper and seam leaks with foil tape, and inspect the interior using lights off to identify any pinholes. Tighten duct and port connections, and manually check each joint to ensure there are no air leaks. To block light while maintaining airflow, use black filter fabric or adhesive Velcro covers. These five cost-free fixes can significantly improve airflow, helping your tent stay sealed and your CO₂ contained—so it goes straight to your plants and not the room. For a sealed environment to work best, your lighting must also deliver adequate photosynthetic energy without overheating the space, which is why choosing an efficient LED grow light can complement your CO₂ strategy.
Why Timer and Fan Beat a Costly CO2 Controller
Setting on/off intervals with a timer during the light cycle prevents wasteful overshoot of CO₂. This approach ensures your exhaust fan runs in controlled bursts, mixing injected CO₂, preventing stagnation, and clearing excess during off periods. Since the fan is already part of your tent setup, using it for timed cycling adds almost no extra cost. Unlike complex controllers that provide dynamic feedback and data logging, a simple timer and fan setup is sufficient for small spaces. It allows you to focus on straightforward dosing and circulation, making your system more efficient without the expense and complexity of advanced automation. Using a regulator with a precision flow meter and industrial solenoid valve can further enhance CO₂ control without needing a full controller.
So Which Cheap CO2 Method Is Right for Your Tent?
For the lowest cost method, yeast and sugar fermentation is your go-to. It costs around $2 to set up and produces CO₂ through natural fermentation. You’ll need to refresh the mixture about once a week to keep the CO₂ levels steady. This method works well for hobby growers with small tents or limited budgets. However, it requires regular maintenance and monitoring to ensure your plants get enough CO₂. While not as convenient as other options, it’s the cheapest way to generate carbon dioxide if you don’t mind the fuss.