Adding CO₂ to your grow tent can boost plant growth, but getting it right takes some know-how. You’ll need a sealed environment and a proper setup that includes a tank, regulator, and sensor for precise control.
By understanding how to do this safely and effectively, you’ll maximize your plants’ potential.
Here’s how to get started with a confident, step-by-step approach.
Prepare Your Grow Tent for CO₂ Enrichment
To prepare your grow tent for CO₂ enrichment, start by creating a sealed environment to prevent CO₂ leaks. Fully close all zippers, cover passive vents, and seal any unused duct ports. Check for gaps and leaks around doors and seams before initiating your first enrichment cycle. Avoid continuous exhaust; instead, rely on setpoint-triggered ventilation that activates only when necessary. This ensures CO₂ remains inside during key growth periods, maximizing its effectiveness. Use a calibrated EC meter to monitor nutrient concentration in the growing medium, ensuring plants can properly utilize the added CO₂. For identifying plants in the sealed environment, metal garden labels offer durable and reliable markers.
Next, manage airflow to distribute CO₂ evenly throughout the tent. Place oscillating fans inside to maintain gentle, horizontal airflow that prevents dead spots where CO₂ might stagnate. Position the fans so they circulate air above the canopy, allowing CO₂ to drift downward naturally. Be cautious not to blow the gas out of the tent or create turbulence that disrupts uniform distribution. Confirm that your HVAC system recirculates air internally and that dehumidifiers are properly sized for a sealed environment. For precise environmental control, consider using a humidistat instead of a basic hygrometer to automate humidity regulation. Integrate controls for temperature, humidity, and CO₂ so they work together during lighting periods to optimize plant growth.

SELF-ACTIVATED - ExHale 365 is a self-activated version of the Original CO2 Bag.The 365 will provide a 4x4 foot or 128 cubic foot space with CO2 for 9 months of which 6 months are peak production. This product is great for small grow rooms and grow tents that are looking to produce more CO2 than what you’d normally have.

Simple CO2 Release Grow Bag: Designed with simplicity and stability in mind, this product is commonly referred to as a CO2 generator bag and functions as a passive CO2 release bag for indoor gardening. It features a light-blocking outer layer to help reduce external interference.The CO2 release structure allows a gradual release process, helping support a balanced growing environment over time. Pre-set holes allow flexible setup based on different needs. Simply open and hang for easy use with other greenhouse accessories.

SELF-ACTIVATED - ExHale 365 is a self-activated version of the Original CO2 Bag.The 365 will provide a 4x4 foot or 128 cubic foot space with CO2 for 9 months of which 6 months are peak production. This product is great for small grow rooms and grow tents that are looking to produce more CO2 than what you’d normally have.
Choose the Best CO₂ Delivery Method for Your Grow
A tank, regulator, and controller setup is the best CO₂ delivery method for small-to-medium grow tents. It provides precise control over CO₂ levels by tying release to your lights-on period, ensuring maximum absorption without overshoot. This system uses clean, compressed CO₂ stored in a tank, allowing you to maintain a specific parts per million (ppm) range consistently. For accurate testing, a best pH meter for water ensures your nutrient solution stays within the optimal pH range, supporting efficient CO₂ uptake. Reusing clean LECA balls requires regular rinsing to remove salt buildup, preventing pH fluctuations that could hinder absorption. Prior to reuse, sterilizing perlite effectively prevents fungal contamination that could compromise root health.
Compared to other options, tank systems offer the most reliability and cleanliness. They allow you to fine-tune CO₂ delivery, which is essential for optimizing plant growth. In contrast, CO₂ burners add heat and produce byproducts that can make controlling your environment more difficult. Passive CO₂ bags are low-cost and simple but lack controllability, while DIY fermentation setups fade quickly and offer inconsistent output.

A gas release system designed to help create the ideal grow environment by regulating CO2 output.

Dual Output Design: Connects to CO₂ equipment and ventilation system simultaneously, maintaining ideal CO2 levels for optimal plant growth.
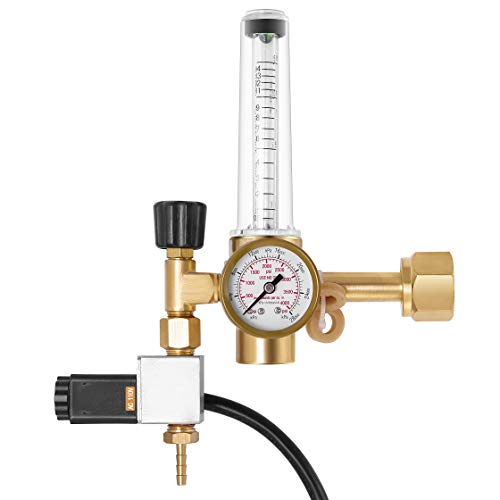
Durable Material: Long-lasting durable brass components will function for many years without rusting
Set Up Your CO₂ Enrichment Tank Safely
To set up your CO₂ enrichment tank safely, start by securing the cylinder upright on a flat, stable surface. Then, attach a chain or strap to a fixed wall about two-thirds up the tank to prevent tipping, falling, or rolling. Keep the tank away from heat sources and direct sunlight to avoid pressure buildup. Use the correct regulator with matching fittings and never force mismatched connections, which could cause leaks or damage. Before installing the regulator, shut the tank valve completely. Perform calibration by checking your regulator’s output against your room’s CO₂ needs to ensure proper distribution. For optimal plant health, consider using top clay balls as a growing medium to support root aeration. Additionally, using perlite for succulents as a soil amendment can further improve drainage and air circulation for potted plants. Regularly inspect the valve and all connections for leaks using an approved detection solution, not flame-based testing. Look for hissing sounds, frost forming around joints, or unstable gauge readings. Additionally, install a dedicated CO₂ alarm and hang warning signs near the entrance to alert others of the gas presence. If you start feeling dizzy or short of breath, immediately stop enrichment and take necessary safety measures. For best results with your growing medium, note that tree fern fiber offers a longer lifespan and superior structural stability compared to coco coir.

Compact Aesthetic Design:This CO₂ regulator aquarium integrates the solenoid and bubble counter into one sleek unit. Its small footprint keeps your aquarium setup clean and minimal — perfect for small and mid-size planted tanks.

Professional Manufacturing: The regulator nut nipple is made of brass, making it a professional kit for use with the CGA-0 NPT1/4 pressure reducing valve

Please note: The thread specifications of this product are designed for standard CGA320 gas cylinders, and the power adapter supports 110–240V. This product is primarily intended for U.S. customers. If you are outside the United States, please check whether the thread specifications and power adapter are compatible with your local setup.
Position the Sensor at Canopy Level, the Delivery Line Above It
Position the CO₂ sensor at canopy level to ensure your readings reflect what the leaves are actually breathing. Mount the sensor above the crop, and run the delivery line above it to allow the gas to disperse downward effectively. Placing the sensor at canopy height captures the concentration most relevant to photosynthesis, rather than a false spike near the injection point. Understanding how a pH buffer solution stabilizes nutrient availability is similarly crucial for consistent plant uptake in indoor growing. For accurate humidity control alongside CO₂ management, a hygrometer ensures the air moisture level supports healthy stomatal function. To avoid distortion, always keep sensors away from walls, direct light, and the delivery line as recommended for safe placement.
Avoid mounting the sensor on walls, under lights, or beside the delivery line, as these spots can distort readings. Keep the delivery line positioned above the sensor to prevent a false high ppm reading caused by the gas plume. Overhead distribution promotes the mixing of CO₂ downward, especially when circulation fans are used to homogenize the gas across the canopy.
Adjust the sensor upward as your crop grows, treating it as the control point for the plant zone rather than a room-wall monitor. Proper placement ensures accurate, representative measurements that support optimal growth conditions.

This sensor is designed specifically for AC Infinity AI controllers to help monitor CO2 levels through adaptive automated learning.
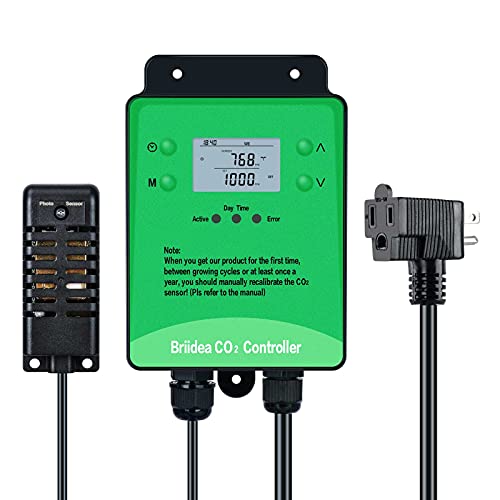
Smart CO2 Control for Plant Growth: Covers all CO2 functions to meet your full growing needs. In light-sensing mode, CO2 runs only in daylight and shuts off automatically when dark to save energy. In “Off” mode, it still monitors the environment while the load stays completely off.

ENS160+AHT21 CARBON Dioxide CO2 Sensor
Target 1,000–1,500 PPM for Veg and Flower
Once your sensor is reading at canopy level, set the CO₂ concentration accordingly. For veg, aim for around 1,000 ppm; during flowering under strong lighting, push the levels to 1,200–1,500 ppm. This range maximizes photosynthesis and promotes vigorous growth. Going beyond 1,500 ppm offers little benefit and can lead to diminishing returns. Adjust your CO₂ levels in accordance with your light intensity—lower lighting setups won’t need the higher end of this range. A CO2 monitor measures the current concentration, ensuring your adjustments stay within the target zone.
The type of diffuser you use is crucial for proper distribution—an efficient diffuser ensures even spread, preventing dead zones where CO₂ might be lacking. Also, check the shelf life of your CO₂ tanks or generators before refilling, as expired or degraded gas may not reach your target concentrations reliably. Keep a close eye on ppm levels, especially in sealed environments, since they can spike quickly. Maintain CO₂ between 1,000 and 1,500 ppm for optimal results across both vegetative and flowering stages. Using a TDS meter for water helps ensure your nutrient solution is accurately mixed for vigorous growth when paired with elevated CO₂. Starting seedlings in seedling trays is a common first step before introducing them to a CO₂-enriched grow tent.
Run CO₂ Enrichment Only During Lights-On
Since plants only fix carbon during photosynthesis, run CO₂ enrichment only during your lights-on period. Start about 15 to 60 minutes after lights come on, once your canopy stabilizes, and stop 30 to 60 minutes before lights off when photosynthesis slows. This timing maximizes gas-use efficiency and minimizes waste by aligning CO₂ delivery with active plant metabolism. For the most reliable results, consider investing in one of the reviewed top CO₂ generators that offer precise control and consistent output for your setup. Connect your CO₂ controller or timer directly to your grow light schedule. For small tents, a simple timer suffices; larger setups may benefit from a setpoint-triggered controller that automates delivery and prevents nighttime injection. During enrichment, keep ventilation minimal to retain CO₂ in the environment and seal unused duct ports to prevent gas escape. This approach ensures you’re delivering CO₂ only when plants are actively photosynthesizing, avoiding unnecessary waste during dark periods.
Calculate Exactly How Much CO₂ Your Tent Needs
To determine exactly how much CO₂ your tent needs, start by calculating its volume in cubic feet. For example, a 4×4×7 tent equals 112 cubic feet. Next, find the ppm difference by subtracting the ambient CO₂ level (typically around 420 ppm) from your target level (such as 1,200 ppm). In this case, the difference is 780 ppm. It is also important to optimize nutrient addition in hydroponic systems to ensure plants can utilize the increased CO₂ effectively. Then, apply the formula: multiply the tent’s volume by the ppm increase and divide by 1,000,000. For this example, 112 cubic feet times 780 ppm divided by 1,000,000 equals approximately 0.087 cubic feet of CO₂. This is the amount needed for a single injection to achieve your target ppm. Using a top soil pH meter ensures accurate monitoring of root zone conditions during CO₂ enrichment.
Remember that plants continuously absorb CO₂, and a closed environment can lead to toxin buildup if you overshoot your target. To deliver this amount, convert the volume into a flow rate by dividing it by your dosing window in hours. Larger tents require proportionally more gas per fill, so adjust your calculations accordingly to maintain optimal CO₂ levels.
Monitor Co₂ With a Controller to Avoid Waste
Monitoring CO₂ with a controller ensures you deliver the right amount without waste. Since plants utilize CO₂ at different rates throughout the day, a controller automatically adjusts your regulator based on live readings. Place the remote probe at plant height inside your tent—never on the wall—so the ppm reading accurately reflects what reaches the canopy. The controller compares this measurement to your target setpoint and activates or deactivates the regulator accordingly. This prevents blind dosing from fixed timers, optimizing gas use. The Niwa Grow Hub+ offers CO₂ monitoring with an optional sensor and historical data tracking to prevent waste and optimize runtime. For greenhouse growers, selecting a system that integrates seamlessly with your existing environmental controls can further streamline this process, much like choosing among the top hydroponic systems reviewed for compatibility and efficiency. For best accuracy, calibrate the sensor by placing it in fresh outdoor air, a simple step that avoids common calibration mistakes like using a salt test.
Regular sensor calibration is essential because drift can cause false high readings, leading to unnecessary gas consumption. Calibrate the sensor against fresh outdoor air, which typically has a ppm level around 400 to 420. Data logging capabilities further enhance control by tracking CO₂ levels over time, revealing leaks or excess exchange. With real-time feedback, you can stop enrichment as soon as your target is reached, saving gas and improving runtime efficiency.

This smart CO2 controller includes two outlets to power and independently program CO2 regulators and exhaust fans.

✔【Dual-Mode Automation】This CO2 controller runs Plant or Human mode. Plant mode starts your CO2 generator when levels drop below target. Human mode turns on ventilation when levels rise. Help feeding crops or clearing air with zero manual checks.

Note: Please calibrate the sensor according to the instructions in our manual before use
Stay Safe During Co₂ Enrichment With Alarms and Ventilation
Installing a dedicated CO₂ alarm at breathing height is essential for safety. Place it away from the gas source to prevent false alerts caused by localized concentrations. Set the alarm to trigger well before 5,000 ppm, OSHA’s 8-hour exposure limit, giving you enough time to respond. When the alarm sounds, immediately activate ventilation systems and shut off gas enrichment. This quick action minimizes the risk of overexposure.
Your ventilation system acts as a critical backup for hazard mitigation. Ensure it provides a continuous, rapid exchange of fresh air to prevent dangerous CO₂ buildup. Verify that exhaust vents are capable of quickly purging the entire tent, avoiding dead zones where CO₂ can accumulate. Proper airflow management is vital, especially if equipment fails in the on position. Always post warning signs around the tent and restrict access during enrichment periods. Relying solely on symptoms is unsafe because high CO₂ levels impair judgment before noticeable symptoms appear.
Prioritize rapid dilution of CO₂ and prompt evacuation if alarm conditions occur. Layered safety measures—alarms, ventilation, clear signage, and controlled access—are your best defense against accidental overexposure.