Looking to grow plants indoors without soil? Building a simple hydroponic system is easier than you might think and can be up and running in under an hour.
With just a few basic supplies like a container, net pots, and nutrients, you can create a thriving mini garden that’s low-maintenance and efficient.
By the end of this guide, you’ll know exactly how to set up a beginner-friendly hydroponic system step by step.
Let’s get started so you can enjoy fresh, home-grown greens in no time.
Pick Your First Hydroponic System: DWC, Kratky, or NFT
For a beginner, Deep Water Culture (DWC) is the best choice among hydroponic systems. It involves suspending plant roots directly in a nutrient-rich water solution, with an air pump supplying constant oxygen. This setup is straightforward and forgiving, making it suitable for growing lettuce, herbs, and other leafy greens. DWC is more resilient during short power outages because the roots remain submerged in water, maintaining oxygen access through the air pump. Many growers also use coco coir as a reliable substrate for moisture retention and root support in DWC systems. To ensure the nutrient solution remains healthy, users should invest in a best pH meter for consistent accuracy. Additionally, sharp pruning shears are useful for trimming dead or damaged roots during system maintenance.
In contrast, the Kratky method requires no pumps or timers. It works by placing plants in a covered container, where water levels drop over time, exposing roots to air. This simple no-power approach makes it ideal for learning about pH and nutrient management without complex equipment.
Avoid starting with Nutrient Film Technique (NFT) initially, as it demands more stable conditions and careful management. NFT involves a thin film of nutrient solution flowing over the roots, which can be less forgiving to fluctuations. Overall, DWC or Kratky provide easier entry points for understanding how nutrient solutions and climate adjustments impact plant growth.

DWC Bucket +Top Drip Kit: The upgraded hydroponic system incorporates a unique top drip irrigation design, facilitating water circulation to maintain nutrient solution freshness and promote efficient absorption

5PCS PP Buckets: Our DWC hydroponic system is equipped with 5 buckets.

8PCS PP Buckets: Our DWC hydroponic system is equipped with 8 buckets made of high-quality PP material for long-lasting use. Each plant bucket features a 5" basket and can hold up to 5 gallons, large enough to help you grow multiple plants at a time.
Gather the 5 Materials Every Beginner System Needs
You need five fundamental materials before setting up your first DWC or Kratky system. First, select an opaque, food-safe water container, ideally a 5-gallon bucket. Its size provides enough space for root development and nutrient solution, while the opacity prevents algae growth. While this bucket works well, adding a layer of coarse perlite to the top of your growing medium can further help block light and improve drainage for succulents.
Next, acquire net pots in the 2 to 3-inch range, which work well for leafy greens and other small plants. Use a growing medium like clay pebbles or rockwool cubes to anchor your plants securely and promote healthy roots. Don’t skip hydroponic nutrients; opt for complete formulas, and choose organic options if desired. Since hydroponics relies solely on liquid feeds, these nutrients are essential for plant growth without soil.
Finally, get pH testing strips or a pH meter, along with an EC meter to measure electrical conductivity. You will also need pH adjusters, such as pH up or down solutions, to keep your nutrient solution within the optimal pH range of 5.5 to 6.5. For proper airflow around your plants, consider adding a clip fan to maintain temperature and humidity control. These five materials keep your setup affordable—typically around $40 to $60—and ensure your plants have a stable environment with balanced roots and proper feeding from day one. To support robust growth during the vegetative stage, also invest in a full spectrum LED designed specifically for enclosed gardening spaces.

Durable & Corrosion-proof Material: Our 5-gallon DWC hydroponic grow system features PP planting buckets that are sturdy, durable, corrosion-proof, and temperature-resistant. Perfect for long-term use without deformation, ideal for plant hydroponics.

Practical Design: This 6-inch net pot lid is fits good on standard 3.5 and 5 gallon buckets.Also fit for 5 gallon Lowe's bucket and home depot buckets. The diameter wide Lip is 12.4".
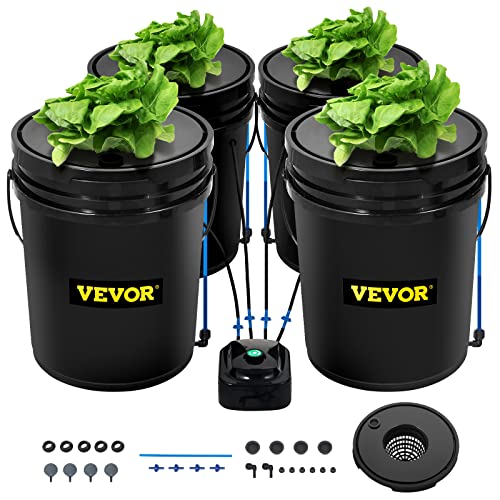
4PCS PP Buckets: Our DWC hydroponic system is equipped with 4 plant buckets made of high-quality PP material for long-lasting use. Each plant bucket features a 5" basket and can hold up to 5 gallons, large enough to help you grow multiple plants at a time.
Build Your Reservoir and Plant Sites in Under an Hour
To build your reservoir and plant sites in under an hour, start with a container that holds 50 to 100 liters. This size is ideal for supporting 4 to 6 plants, providing enough nutrient supply for three to five days without refilling. Choose an opaque container to prevent light from entering, which greatly reduces algae growth in the nutrient solution. For assessing the light levels needed for your plant growth, you should use a PAR meter instead of a lux meter for more accurate readings. Selecting appropriate pruning shears for your garden tasks will ensure clean cuts and healthy plant maintenance. A root stimulator can be added to the nutrient solution to encourage rapid root development and reduce transplant shock.
Next, customize the lid for your system. Use your net pot as a template and mark evenly spaced holes, typically four for a four-plant setup. Use a hole saw to drill each opening cleanly, ensuring a smooth edge to avoid damaging plant stems. Near the edge of the reservoir, drill a small 1/4-inch hole for tubing or cords. Add X-shaped slits nearby to keep the lid mostly closed while allowing routing of cables or tubes. Before filling with water, test-fit each net pot to confirm proper placement and fit. This entire process can be completed in less than an hour.
Mix Hydroponic Nutrients: pH and EC Targets That Work
You should aim for a pH between 5.8 and 6.2 when mixing hydroponic nutrients. This range ensures the maximum availability of essential nutrients like iron and manganese, preventing deficiencies that can hinder plant growth. To achieve this, start with your nutrient formulation and then check your source water’s EC to ensure it’s below 1.0 dS/m. This buffer provides room for fertilizers salts to build up without pushing the solution into excessive salinity. For growers reusing perlite, sterilizing it in a heat-safe container with a baking sheet prevents contamination that could disrupt these delicate nutrient balances. To ensure accurate readings, you should calibrate your pH meter regularly using a simple at-home procedure. For high-quality cutting tools that last, consider professional bypass pruning shears from a trusted brand.
Adjust the pH gradually, adding pH stabilization agents as necessary, because pH drift can lock out nutrients. Continually monitor and correct pH to maintain this optimal range. EC levels should be tailored to your crop’s growth stage. Seedlings typically thrive at 0.8 to 1.2 mS/cm, while flowering crops like tomatoes need 2.5 to 3.5 mS/cm. For leafy greens such as lettuce, keep EC lower at 0.8 to 1.2 mS/cm with a pH of 5.5 to 6.0.
Regularly check your meters to avoid small errors that can lead to large problems over time. Expect pH and EC levels to drift as plants absorb nutrients, so make adjustments gradually and avoid overshooting targets. Maintaining these parameters ensures your plants receive consistent, balanced nutrition for healthy, vigorous growth.

Application: Great for all home and laboratory TDS & pH testing applications including aquariums, swimming pools

Easy auto. calibration with buffer recognition; auto. temp. compensation (ATC) ensures accuracy in various temperatures (32 to 122F)

Precisely Calibrate & Protect Your pH Meters – The GIDIGI pH Solution Kit includes 3x50ml pH buffer calibration solutions (4,7,10 pH buffer solution) and KCl pH electrode storage solution, designed for flawless pH solution calibration and long-term probe care. Our high-accuracy (±0.01pH @77.0℉) ph calibration solution ensures reliable readings for lab, pool, hydroponic and more. The double-sealed, ready-to-use ph meter calibration solution requires no mixing—just dip your probe for instant calibration. Bonus: ph probe storage solution extends electrode lifespan, making this kit a must-have for ph meter storage solution needs.
Start Seeds and Transplant Seedlings the Right Way
To start seeds for your hydroponic system, use rockwool starter cubes or coco coir plugs because they retain moisture while allowing essential airflow to the roots. Soak the cubes in pH-adjusted water until just moist; avoid soaking until dripping to prevent waterlogging. Practice seed sterilization before planting to minimize fungal issues and improve germination success.
Place larger seeds 3–5 mm deep in the medium; fine seeds like basil should remain on the surface. Maintain a germination temperature of 68 to 77°F and cover the setup with a humidity dome to support sprouting. Keep the media dark until the sprouts emerge, then provide light once the first true leaves appear. If you run out of rockwool or coco coir, you can substitute perlite alternatives like coarse sand or vermiculite for seed starting, though they require more careful watering.
Transplant seedlings when they develop 2–3 sets of true leaves and have white roots extending 1 to 2 inches from the plug. Gently position the seedling into a net pot filled with clay pebbles, ensuring the stem base sits at the rim of the pot. Adjust your water level so it just touches the bottom of the net pot, supporting healthy root development without submerging the delicate seedling. Choosing the right moisture meter type helps you verify that the growing medium stays properly hydrated without oversaturation. Maintaining proper airflow and ventilation during the germination and early growth stages is critical to prevent excess humidity and fungal growth, just as you would manage your grow tent’s climate.

Package Includes: You will get 4 sheet rockwool cubes, a total of 200 pcs plugs; These lightweight rockwool are suitable for seed germination, cuttings, or cloning, ensuring optimal root development in hydroponics, aeroponics, or soil-cultivated gardening systems

Package Includes: You will get 2 sheet rockwool cubes, a total of 100 pcs plugs; These lightweight rockwool are suitable for seed germination, cuttings, or cloning, ensuring optimal root development in hydroponics, aeroponics, or soil-cultivated gardening systems

Rockwool Cubes for Easy Propagation – 1.5" Grodan Mini Blocks are the perfect size for starting seeds, clones, and cuttings, giving roots a healthy start in a stable environment.
Keep Your Hydroponic System Clean and Running Smoothly
Keeping your hydroponic system clean after transplanting is essential for continued plant health and optimal growth. Start by fully draining the reservoir and flushing the pipes with fresh water to remove mineral deposits and any microbiological residue. Use a wet/dry vacuum or a cloth to clear out any sludge from corners, then scrub the walls and the waterline ring with a soft brush to eliminate salt crust and organic buildup. While cleaning, remember that your hydroponic system’s durability mirrors the choice between metal ducting and flexible ducting, where metal offers a longer lifespan. Pay close attention to light-exposed surfaces and tubing to prevent algae growth. A low concentration of hydrogen peroxide, around 0.1%, can help inhibit biofilm formation in the lines. Replace any tubing that has become heavily discolored. To sanitize the entire system—including the reservoir, lines, pumps, and emitters—use a diluted bleach solution or peracetic acid between crop cycles. Always rinse thoroughly to prevent crop damage from residual chemicals before refilling.
After cleaning, refill the system with filtered water and reset your nutrient solution. Check the pH and electrical conductivity (EC) to ensure proper nutrient balance, and inspect fittings for leaks. Regular cleaning reduces the risk of clogging and pathogen buildup, keeping your hydroponic system running smoothly and efficiently.

dissolves accumulated fertilizer salts.

【8 Pack A & B Hydroponic Plant Food】Our hydroponics supplies plant food is equipped with 2 bottles and extra 6 pack of A&B nutrients, which provide you with endless supplies and the essential elements necessary for healthy indoor or potted plants growth

General Hydroponics TrueFlo Irrigation Line Cleaner cleans and maintains hydroponic irrigation systems and equipment
3 Weekly Checks to Stop Algae and Nutrient Lockout
Running three focused checks each week is essential to prevent algae and nutrient lockout. Begin with a light-blocking inspection by examining reservoirs, tubing, and net pots for any translucent gaps or shifted covers. Seal these immediately since algae prevention relies on keeping your solution dark. To streamline this process, consider using air stone diffusers as part of your aeration setup to ensure oxygenation while eliminating light entry points. Next, test your pH weekly on the same schedule. Track trends over time rather than relying on a single reading because gradual shifts can signal potential problems with nutrient uptake. Recalibrate your pH meter regularly to ensure accurate data. Lastly, measure EC or TDS consistently to detect salt buildup. An increasing EC reading combined with slowed nutrient uptake indicates overfeeding or evaporation issues. Compare your readings week to week, particularly after topping off, to ensure nutrient levels remain stable. For accurate EC measurements, consider using one of the top EC meters reviewed for hydroponic reliability. Performing these checks regularly helps maintain nutrient balance and stops algae from gaining a foothold in your system. While monitoring your light exposure, confirm your grow lights provide full spectrum illumination to support robust plant photosynthesis and prevent weak growth.