Building a stealth grow space on a budget is easier than you might think. Choosing a used wardrobe or a small PC case can save money while creating a discreet environment for your plants.
With some simple modifications, you can turn these into effective grow boxes without breaking the bank.
By the end of this guide, you’ll know how to line, seal, and ventilate your grow space efficiently and affordably.
Get ready to craft a low-cost, effective habitat for your plants that stays hidden and odor-free.
Choose the Right Wardrobe or PC Case for Your Stealth Grow Box
Choosing the right wardrobe or PC case for your stealth grow box is crucial because your enclosure’s size and design directly impact functionality and stealth. For wardrobe setups, ensure there is enough internal height—typically at least 4 feet—to allow for proper light clearance and an effective top-mounted exhaust zone. Deeper cabinets, around 20 to 24 inches deep, facilitate better airflow paths and ducting options compared to shallower units. Preexisting shelves are useful, as they help separate heat-management equipment—like fans and filters—from the plant space below. Confirm that the door closes fully to prevent light leaks, which are key to maintaining stealth. For similar stealth and efficiency, consider using high-quality coco chips as your growing medium to improve drainage and aeration. Using a bloom booster fertilizer during the flowering stage can further enhance bud development and flower color. However, not all LED lights provide full spectrum illumination, so verify your light source covers the necessary wavelengths for healthy plant growth.
When modifying a PC case, opt for a mid-tower or larger model. These cases provide adequate space for ventilation equipment and allow easier mounting of fans and grilles. A sturdy metal shell is preferred over plastic or compact cases, as it supports better mounting options and withstands the heat generated during operation. Compact cases tend to restrict airflow and can be overwhelmed by strong LEDs, increasing the risk of heat buildup. Keep the interior uncluttered—overcrowding hampers airflow, raising internal temperatures. Position intake vents low and exhaust fans high to follow natural heat movement, ensuring consistent airflow and effective temperature control.
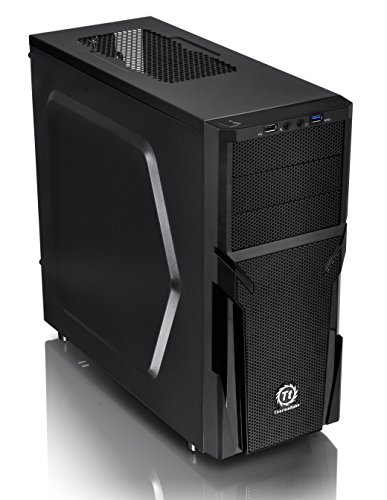
Designed for gamer, perforated metal mesh front and top panel to allow quick heat dissipation and rapid air intake for maximum ventilation. The heighten foot-stands at the bottom help to enhance airflow

Optimized Air Flow - Up to 11 x system fans could be installed. Provides the whole system with ventilation for better stability

Safe & Practical Design: Hovadova computer tower stand elevates your PC off the floor, protecting your PC from dust, spills, carpet fibers and moisture. Dual guardrails securely prevent slipping and fall protection, while allowing easy access to rear ports. Keep your setup tidy and safe on any surface
Mylar vs. White Paint: The Best Cheap Reflective Lining for Your Stealth Grow
Mylar generally provides higher reflectivity than white paint, but its effectiveness depends on proper installation. Mylar can reflect up to 98% of light when perfectly smooth, making it ideal for maximizing light intensity inside your grow space. However, achieving a flawless surface is tricky, requiring careful cutting, fastening, and smoothing to avoid wrinkles that reduce its reflectivity. For growers needing to manage humidity, a best dehumidifier for grow room can complement your reflective lining to maintain optimal conditions. When selecting your lining, consider that hydroponic net pots are often used alongside these reflective materials to ensure healthy plant growth. For consistent monitoring of nutrient solution quality, a pH meter for water can help you maintain the ideal acidity levels in your reservoir.
White paint, on the other hand, offers a more straightforward and forgiving option. A single coat of matte or flat white paint can scatter light evenly across surfaces, providing a diffuse reflection that minimizes hotspots. It’s easier to apply—just roll it on—and is significantly cheaper, making it perfect for those on a tight budget. While its reflectivity ranges from 80% to 90%, the ease of installation often outweighs the higher peak reflectivity of Mylar for most growers pursuing a stealthy, budget-conscious setup.

【High-Reflection Mylar】 – 98% reflective diamond-pattern interior maximizes light efficiency for faster plant growth

Exceed Value : 6 pack high silver eeflective mylar film, 83X63IN / 210X160CM, can be cut into different sizes to ensure daily use. Durable, puncture resistant and tear resistant.

UPGRADED ZIPPER FLAP FOR PERFECT LIGHT LOCKING: MARS HYDRO grow tent interior is highly reflective density diamond mylar. An exclusive shade cloth is equipped on the stitching between zipper and canvas, avoiding any pinhole leaks. The 1680D canvas is double stitched, tear proof for perfect light locking and keeps 100% lighting beams inside
Where to Place Your Intake and Exhaust for Maximum Stealth Grow Box Airflow
Place your intake vent low and your exhaust vent high to optimize airflow in your grow box. Mounting the intake near the bottom allows cool, dense air to enter naturally, while positioning the exhaust at the top enables warm, humid air to exit effectively. This setup takes advantage of natural convection, promoting a consistent airflow pattern without the need for excessive fans. For optimal light penetration and plant health, consider pairing your airflow setup with a top-rated LED grow light stand that offers reliable performance and adjustable height.
Make sure these openings are positioned far apart—preferably on opposite sides or corners—to prevent short-circuiting of airflow. This encourages air to pass across the entire canopy, reaching all plants evenly. Keep the passive intake area two to four times larger than your exhaust duct opening, reducing resistance and preventing whistling or turbulence. You can verify your water source’s pH remains balanced for plant health using pH test strips to avoid nutrient lockout. For optimal growth, you should also consider using hydroponic nutrient solutions to ensure your plants receive all essential minerals.
When installing your fan and filter, keep the exhaust path short and direct. Mounting the fan at the top opening minimizes backpressure and noise, while positioning the intake at the lower front and the exhaust at the upper rear creates a discreet, efficient airflow sweep that benefits your plants. Proper placement ensures maximum stealth, airflow, and overall grow success.
The Only Odor Control You Need: A Carbon Filter and Negative Pressure
Sealing the deal with a carbon filter and negative pressure is your best odor control strategy. Mount the filter inside the grow box and attach the fan and ducting to exhaust outside. The fan pulls air through the activated carbon filter, which adsorbs smell molecules before they escape. This process uses adsorption rather than absorption, trapping odors within the porous surface of the carbon. Maintaining negative pressure is crucial; your exhaust fan should move more air than your passive intakes allow. This creates a slight inward bowing of your box walls, preventing odor from bypassing through tiny cracks. For proper setup, understand that the carbon adsorbs smell by a process distinct from absorption, as described in mastering the pronunciation of vermiculite’s physical properties. To ensure the filter media remains effective, you can also apply a sterilization process to the perlite used in your grow medium. Over time, the carbon in the filter will become saturated after a grow cycle or heavy use, causing odors to escape. To stay stealthy, match your fan and filter flanges properly, keep ducting as short and straight as possible, and ensure your system operates under consistent negative pressure. Regularly check the filter’s condition and replace it when odors start to leak through. Proper setup and maintenance are key to effective odor control with a carbon filter and negative pressure system.

Dual layer high air flow design for 4 inch air ducts

Excellent Odor Control: Made of premium RC 412 Australian Virgin charcoal at 1200+ IAV, helps to eliminate pungent smells and chemicals; The 38mm thick charcoal bed with high microporosity ensures its high absorption

Efficient Filtration: This carbon filter offers exceptional durability and efficiency; It captures 99% of particles down to the nanoscale level, effectively eliminating odors and ensuring fresher air
How to Wire Your Grow Light and Timer Safely in a Wooden Stealth Box
Before plugging in your grow light, calculate the total wattage and select a timer rated for continuous loads—aim for at least 20–25% above your total power draw. This safety buffer prevents overloads and prolongs the timer’s lifespan. Place the timer outside the wooden stealth box to protect it from humidity and potential corrosion, which can occur quickly inside the enclosure. Never mount the timer directly on combustible wood inside the box, as it poses a fire risk. The Plug and Grow PGAPEXUK timer is uniquely rated for a 13A inductive load, allowing it to switch multiple ballasts without expensive contactors. For precision clean cuts on plants, also consider the ergonomic design of best pruning shears when maintaining your garden’s foliage. For the snake plants inside your grow box, choosing a perlite mix with good aeration prevents root rot while supporting healthy growth. Using a mist sprayer ensures even moisture distribution without overwatering sensitive roots.
Before working on wiring, turn off the breaker and confirm that all wires are dead using a voltage tester. Follow the timer’s wiring diagram to connect the LINE, LOAD, neutral, and ground wires correctly. Use strain relief devices on cords to prevent tension from door movements from pulling on the terminals. Keep all wires elevated off the floor and away from potential spills or moisture exposure.
Test your timer’s schedule before leaving it unattended to ensure it operates correctly. Check for signs of warmth or buzzing during operation, which indicate overload or faulty connections. Although LED grow lights draw steady power, budget timers may fail under continuous loads. Always incorporate surge protection and avoid daisy-chaining extension cords. Keep all electrical components separate from wet zones to minimize fire and electrocution risks.
Your Stealth Grow Box Is Too Hot? Try These Budget Overheating Fixes
To combat excessive heat inside your grow box, start by optimizing your exhaust airflow. Choose a fan that can replace the entire air volume of your chamber every 1 to 3 minutes. Calculate this by dividing the box’s volume in cubic feet by 2 to determine the required CFM (cubic feet per minute), then add a safety margin for carbon filters and bends in the ducting. Match your passive intake to your exhaust; place the intake low and the exhaust high to take advantage of rising heat. Adding an oscillating fan near the canopy helps break up hot spots and promote uniform airflow. Adjust the grow light position by raising the lamp or dimming it slightly to reduce heat load. Shifting your light cycle to cooler hours, such as nighttime, also helps lower temperatures. Keep ducting short and avoid tight bends to maintain efficient airflow and prevent unnecessary resistance. These straightforward fixes can significantly reduce heat buildup without breaking the bank. If you are using full spectrum LEDs, switching to a high-efficiency model designed specifically for orchids can further minimize heat output while providing optimal light for your plants. For reference, the best LED grow lights for Monsteras often include high-efficiency models that reduce heat output while delivering appropriate light spectrum. To ensure your light intensity is accurate after adjustments, using a lux or PAR meter can help you compare cost and lifespan differences between the two measurement tools.

High-Efficiency 280 CFM Airflow - Powerful 2200 RPM motor delivers exceptional ventilation capacity. This 4 inch duct fan effectively removes moisture and odors from grow tents, bathrooms, and kitchens as a reliable inline exhaust fan.

Universal Applications: Take a deep breath and relax. Our inline duct fan is specially designed as an exhaust for heat, humidity, and smoke, improving airflow in air planting tents, hydroponic planting rooms, electronic equipment rooms, kitchens, basements, etc. Get ready to go with the flow.

Suitable for Grow Tents: The inline duct fan is ideal for small indoor ventilation and grow tent applications. It helps reduce odors caused by stagnant air while ensuring comprehensive airflow and circulation
Seal Every Light Leak and Smell to Make Your Stealth Grow Truly Invisible
Sealing every joint, seam, and opening is essential because light leaks and smell escapes both travel through the same gaps. Start with matte-black interior seams to eliminate pinhole reflections, then use overlapping panels—avoiding butt joints—to block direct line-of-sight leaks effectively. Weatherstripping around doors and tightly fitting cable pass-throughs are non-negotiable; if you see any light, it indicates a leak that needs immediate sealing. To verify your work, pH test strips can help confirm that any residual moisture is not creating acidic conditions that might degrade your seals over time. For a more precise check on moisture-related damage, using a tree moisture meter can help you identify damp spots before they compromise your sealant.
For airflow, route all exhaust through a carbon filter placed before the fan, ensuring every outgoing molecule is scrubbed. Match the filter’s capacity to your fan’s output to prevent bypass and seal every duct port and flange tightly. Regular inspection is key—materials settle, clamps loosen, and small leaks can reappear over time. Achieving a truly invisible grow box requires controlling every air and photon path at the source to eliminate unintended leaks. The filter’s 770 CFM airflow rating and 38mm thick Australian charcoal layer ensure high adsorption capacity that keeps up with strong exhaust demands while resisting humidity-related rust.